Configuración de compañía/aula/empresa: Desarrollador
![]()
Solo disponible para
Los administradores de las ediciones Enterprise y Professional pueden registrar nuevas aplicaciones en Onshape, gestionar y distribuir aplicaciones a los usuarios, y gestionar las claves de API para los usuarios.
The steps on this page apply only to company, classroom, or enterprise administrators. Individual users should follow the Developer Portal steps instead.
All applications created in the Company/Classroom/Enterprise Settings count towards the company's API Limits. All applications created in the Developer Portal count toward the individual user's API Limits.
Para obtener más información sobre la creación y gestión de las aplicaciones de Onshape, consulte la Documentación para desarrolladores de Onshape.
Haga clic en el ícono de usuario (![]() ) de la esquina superior derecha de la ventana de Onshape y seleccione la configuración de la compañía, el salón de clases o la empresa en el menú desplegable.
) de la esquina superior derecha de la ventana de Onshape y seleccione la configuración de la compañía, el salón de clases o la empresa en el menú desplegable.
Haga clic en Desarrollador en el panel izquierdo:
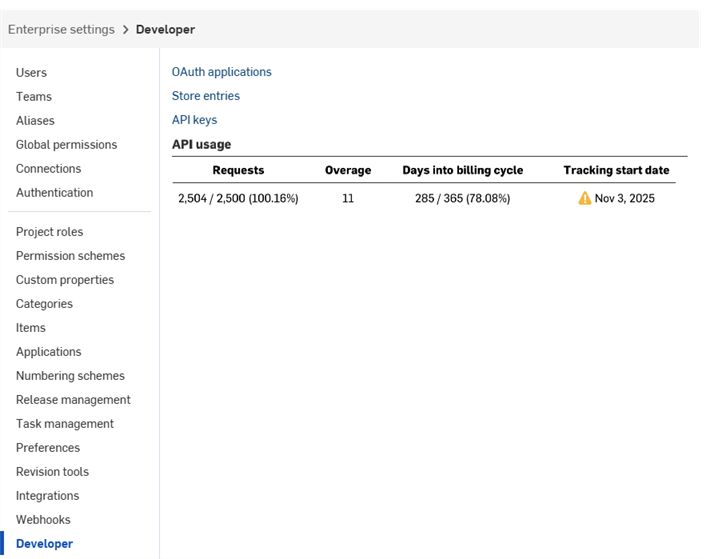
Desde esta pantalla, los administradores pueden hacer lo siguiente:
-
Registrar una nueva aplicación de OAuth en Onshape
-
Compartir aplicaciones con usuarios, alias y equipos de la compañía
-
Enviar las aplicaciones correctamente autenticadas a Onshape App Store
-
Ver, crear y eliminar las claves de API para cualquier miembro de la compañía
-
Ver el uso de la API para la compañía
- Consulte Límites de API para obtener más información sobre el uso de las API.
-
Los correos electrónicos de notificación se envían a todos los administradores con un uso del 25 %, 50 %, 75 % y 100 %.
The steps on this page apply only to company, classroom, or enterprise administrators. Individual users should follow the Developer Portal steps instead.
All applications created in the Company/Classroom/Enterprise Settings count towards the company's API Limits. All applications created in the Developer Portal count toward the individual user's API Limits.
Para crear una aplicación que se abra en la interfaz de usuario de Onshape para uso interno o pruebas:
- Registre la aplicación en Onshape.
- Cree una extensión para la aplicación en la interfaz de usuario de Onshape.
- Asigne usuarios a la aplicación.
Para publicar la aplicación en la Onshape App Store para los usuarios finales:
- Autentíquese mediante OAuth2.
- Cree una entrada en la App Store.
- Complete la lista de verificación de lanzamiento.
-
Click the OAuth applications link on the Developer page to see a list of all your apps:

-
Haga clic en el botón Crear una nueva aplicación de OAuth.
-
Rellene el formulario:
-
Nombre: es el nombre de la aplicación que se muestra a los usuarios.
-
Formato principal: cadena que identifica de forma exclusiva la aplicación y funciona como marcador para los datos que puede almacenar en los servidores de Onshape (p. ej., com.ejemplo.ejemplo). No se puede cambiar una vez registrada la aplicación. No se muestra a los usuarios.
-
Resumen: descripción de la aplicación, que se muestra al usuario cuando se le pide que otorgue permiso a la aplicación para acceder a sus datos.
-
URL de redirección: URL a la que se le redirige después de la autenticación; la página de aterrizaje de la aplicación.
- La aplicación debe especificar al menos una URL utilizada en los intercambios de protocolos OAuth.
-
This URL must also use SSL (a URL that begins with https), with two exceptions applicable for installed desktop applications: http://localhost:<port> and urn:ietf:wg:oauth:2.0:oob.
-
Tipo: es el tipo de aplicación, por ejemplo, Aplicación en la nube integrada, Aplicación en la nube conectada o Aplicación de escritorio conectada.
-
URL de OAuth:: URL que se utiliza para iniciar el proceso de OAuth2 para autenticar al usuario. Para obtener más información, consulte la documentación para desarrolladores: OAuth2.
-
Debe contener la URL de la aplicación implementada.
-
Esta es la primera URL a la que se accede desde la página de aplicaciones de Onshape.
-
La página que se aloja en esta URL debe gestionar la autenticación de OAuth. Una vez que el servidor de la aplicación se haya autenticado en nombre del usuario, ese usuario debe ser redirigido al contenido de la aplicación.
-
Si aún no ha implementado la aplicación, puede dejar este campo en blanco para el trabajo local y actualizarlo más adelante.
Todas las solicitudes enviadas a la Onshape App Store para uso público deben autenticarse correctamente mediante OAuth2. Para obtener más información, consulte la documentación para desarrolladores: OAuth2.
-
-
Ajustes
-
Admite la colaboración: active esta opción si quiere colaborar con otros usuarios cuando desarrolle la aplicación.
-
- Permisos: consulte los Alcances de los permisos a continuación.
-
-
Haga clic en Crear aplicación.
-
Copie la clave secreta de OAuth de la ventana.
No podrá volver a acceder a esta clave secreta. Este secreto es exclusivo para usted y su aplicación. Debe protegerse como cualquier contraseña confidencial y nunca debe registrarse en el código de origen.
-
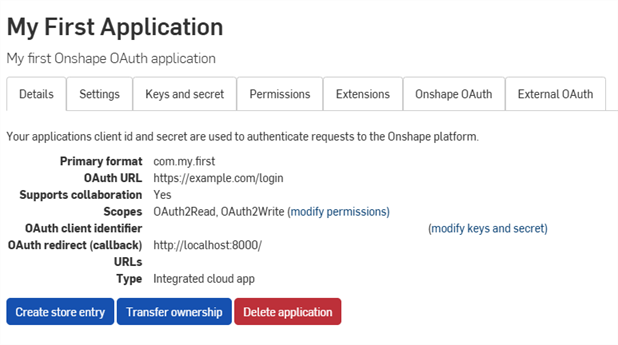
The app's OAuth application entry appears with the Details tab active. Selecting the app name on the OAuth applications page now brings you to this screen.
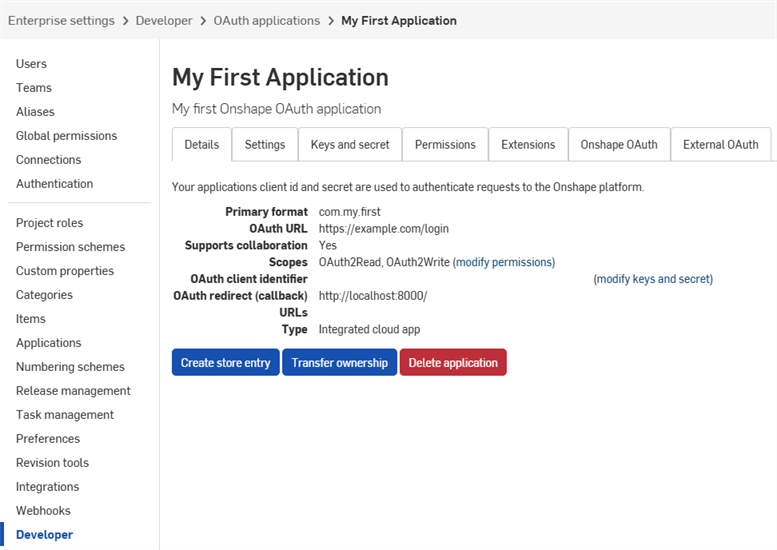
Use the tabs on this screen to:
-
Detalles:
-
Configuración: gestionar la configuración de la aplicación.
- Claves y secreto:
- copiar la clave de identificación del cliente de OAuth.
- regenerar una nueva clave secreta de cliente de OAuth.
-
Permisos: modificar los alcances de permisos de la aplicación.
-
Extensiones: gestionar las extensiones de la aplicación.
-
OAuth de Onshape: gestionar la autenticación de Onshape.
-
OAuth externa: gestionar la autenticación de terceros.
Para obtener más información, consulte la documentación para desarrolladores de Onshape, que incluye lo siguiente: autenticarse correctamente con OAuth2 y completar la lista de verificación de lanzamiento. Para ver un ejemplo práctico, consulte el tutorial Hello World.
-
Click OAuth applications on the Developer page, then select your application.
-
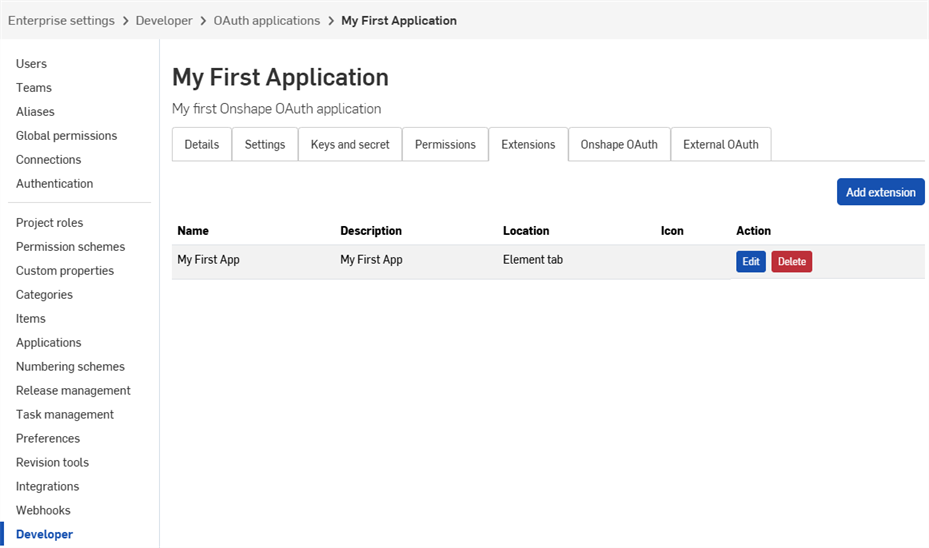
Haga clic en la pestaña Extensiones.
-
Haga clic en Agregar extensión.
-
Rellene el formulario:
-
Name: Can be truncated in the UI if it is too long.
-
Descripción (opcional): no aparece en la interfaz de usuario de Onshape, pero podría aparecer en el proceso de otorgamiento de la autenticación.
-
Ubicación: donde existe la extensión en la interfaz de usuario de Onshape.
-
Consulte las ubicaciones y los contextos admitidos en los documentos para desarrolladores.
-
Solo puede crear una extensión de pestaña de elementos por aplicación.
-
-
Contexto: algunas ubicaciones funcionan en el contexto de una selección, como por ejemplo, dentro de un elemento Part Studio.
-
Consulte las ubicaciones y los contextos admitidos en los documentos para desarrolladores.
-
-
URL de la acción: las ubicaciones que incorporan una interfaz de usuario utilizan la URL de la acción para definir la dirección de la página que se va a mostrar. La URL de la acción se usa para especificar el punto final de REST si la ubicación es una acción (menú contextual, elemento de la barra de herramientas, acción en el cuadro de diálogo, etc.) y el tipo de acción es GET o POST. Si la ubicación es una acción y la acción es Abrir en una ventana nueva, la URL de la acción es la URL que se va a abrir en la nueva ventana.
-
Consulte Parámetros de URL de la acción en los documentos para desarrolladores para obtener una lista de los parámetros que se pueden usar en este campo.
-
-
Tipo de acción: aplicable a las ubicaciones que no incorporan interfaces de usuario. Los tipos de acción admitidos son los siguientes:
-
GET: realiza una llamada a la API GET utilizando la URL de la acción. El reemplazo de parámetros se realiza en la URL de la acción.
-
POST: realiza una llamada a la API POST utilizando la URL de la acción y el cuerpo de la acción como cuerpo de la publicación. El reemplazo de parámetros se realiza tanto en la URL de la acción como en el cuerpo de la acción.
-
Abrir en ventana nueva: se abre la URL de la acción en una ventana nueva del navegador. El reemplazo de parámetros se realiza en la URL de la acción.
-
-
Cuerpo de la acción: solo se aplica a los tipos de acción POST. El cuerpo de la acción se pasa en una llamada a la API POST y debe estar en un formato JSON válido.
-
Mostrar respuesta: esto solo es aplicable si el tipo de acción es GET o POST. Cuando se selecciona, la interfaz de usuario espera una respuesta y la muestra en un cuadro de diálogo en la interfaz de usuario. La respuesta debe estar en un formato JSON válido.
-
Ícono: el ícono se muestra donde existe la extensión, que puede incluir un ícono en un panel de información, una acción del menú contextual, un botón de la barra de herramientas, un botón de acción en un cuadro de diálogo u otras ubicaciones compatibles.
-
-
Haga clic en Aceptar.
Para obtener más información sobre la creación y administración de aplicaciones de Onshape, consulte la documentación para desarrolladores de Onshape. Consulte el tutorial de Hello World para ver un ejemplo práctico.
Los administradores pueden añadir usuarios internos a las aplicaciones para probarlas antes de enviarlas a la Onshape App Store. Los usuarios añadidos aquí ven automáticamente las extensiones de aplicación asociadas en su interfaz de usuario de Onshape, sin tener que suscribirse a través de la App Store.
-
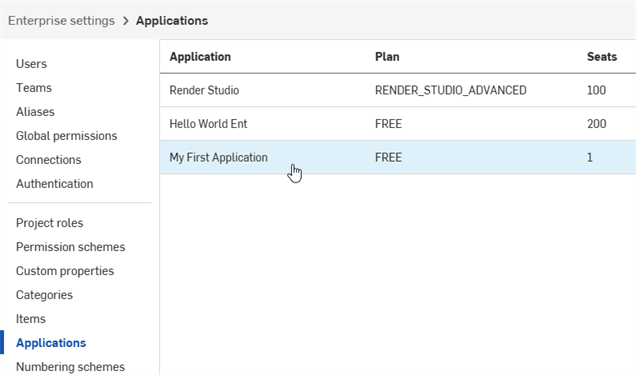
Una vez que tu aplicación se haya registrado, haga clic en Aplicaciones en el panel izquierdo.
-
Seleccione la aplicación de la lista.
-
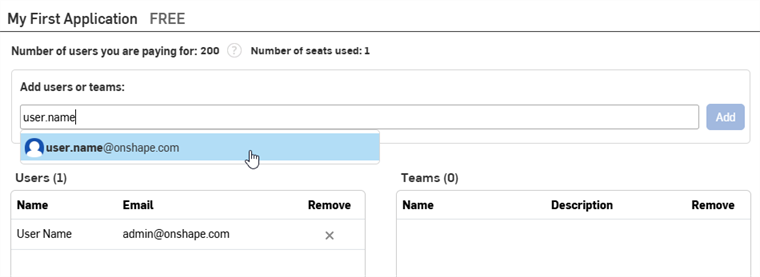
Empiece a escribir el nombre o el correo electrónico de un usuario, equipo o alias en el campo Añadir usuarios o equipos y seleccione un resultado de la lista. El administrador que creó la aplicación aparece automáticamente en la lista de usuarios. Siga añadiendo nombres o correos electrónicos.
-
Haga clic en el botón Añadir.
Los usuarios ligeros no se pueden añadir a las aplicaciones.
Para quitar un usuario, un alias o un equipo de la aplicación, haga clic en su ícono X en la columna Quitar.
- In your Developer settings, click OAuth applications.
- Click the name of the app to transfer.
- Click the Transfer ownership button on the Details tab. The Transfer dialog opens.
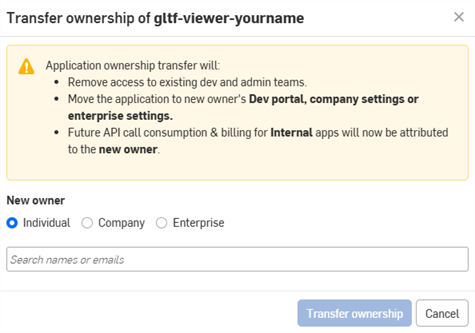
- Seleccione una opción para transferir la aplicación a una persona o empresa.
- Para transferir a una persona, introduzca el nombre o el correo electrónico del nuevo propietario en el campo de búsqueda. Para transferir la propiedad a una empresa, seleccione una opción del menú desplegable.
- Haga clic en Transferir propiedad. La aplicación se eliminará de su lista de aplicaciones de OAuth.
- Si la aplicación se transfirió a una cuenta individual, esta recibirá una notificación por correo electrónico y la aplicación aparecerá en su portal para desarrolladores de Onshape.
- Si la aplicación se transfirió a una persona en una compañía, salón de clases o empresa, todos los administradores reciben una notificación por correo electrónico y la aplicación aparece en su configuración de desarrollador.
El consumo y la facturación futuros de las llamadas a la API se atribuirán al nuevo propietario. Consulte Límites de la API para obtener más información.
Antes de enviar una aplicación a la Onshape App Store, consulte la documentación para desarrolladores de Onshape para conocer los requisitos, incluida la autenticación adecuada con OAuth2 y el cumplimiento de la lista de verificación de lanzamiento.
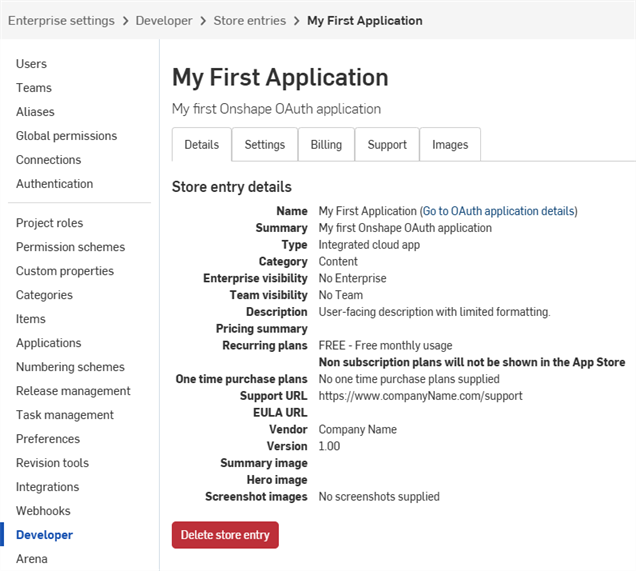
To review, edit, or delete an existing Onshape App Store entry, click Store entries in your Developer settings, then select the entry to modify.
Para crear una nueva entrada de la tienda para una aplicación de OAuth:
-
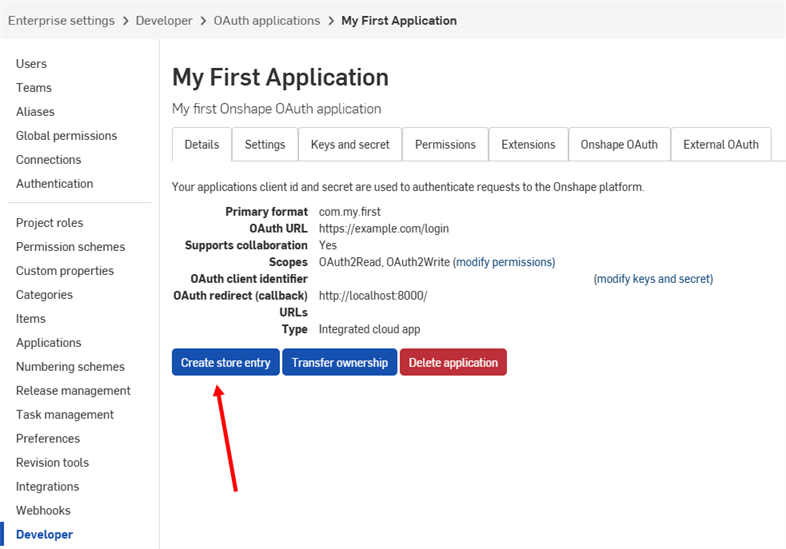
In your Developer settings, click OAuth applications.
-
Click the app name in the list.
-
Click Create store entry on the app's Details page.
-
Rellene el formulario:
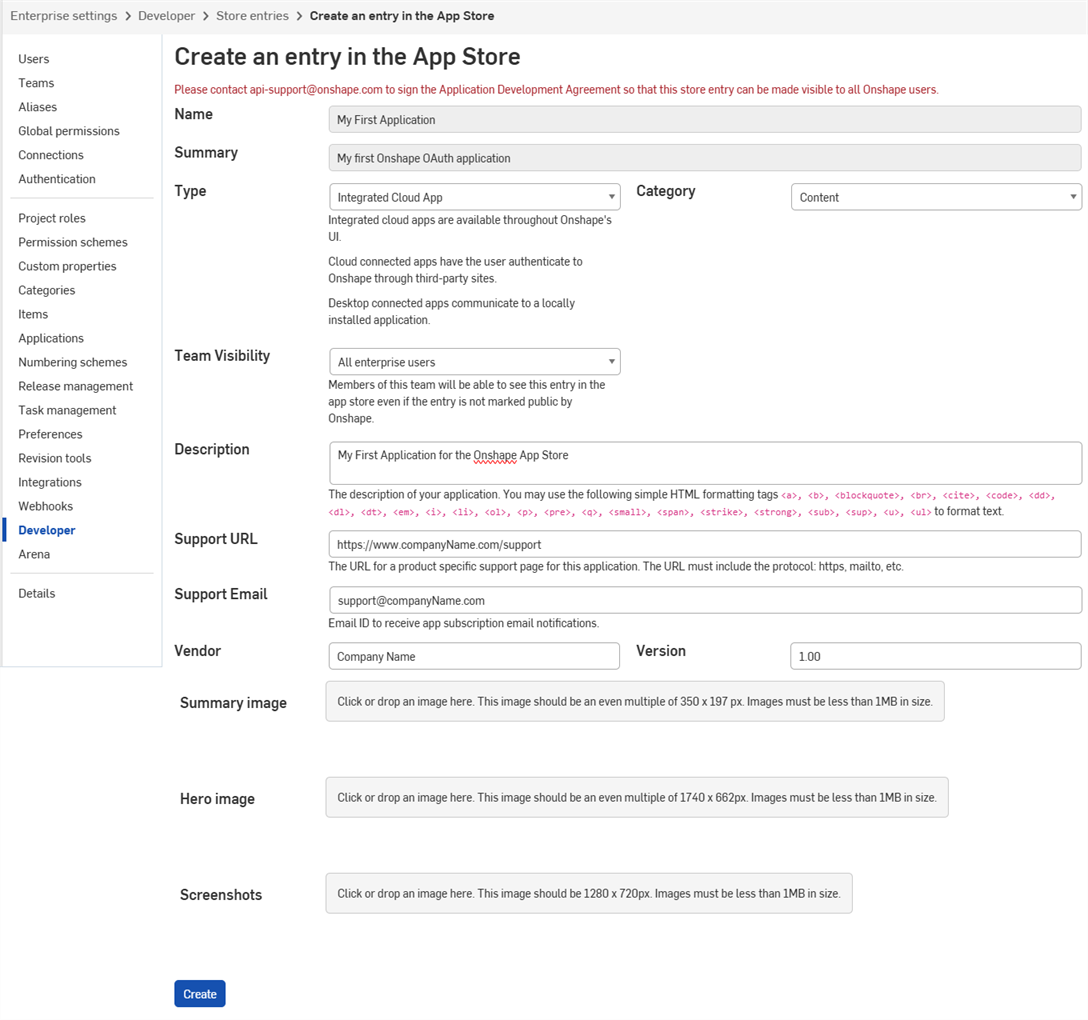
- Nombre: se define automáticamente a partir del nombre de la aplicación proporcionado durante el registro.
-
Resumen: se define automáticamente a partir del resumen proporcionado durante el registro.
-
Tipo: tipo de aplicación, por ejemplo, Aplicación en la nube integrada, Aplicación en la nube conectada o Aplicación conectada al escritorio. Debe coincidir con el valor de Tipo que se seleccionó al registrar la aplicación OAuth.
-
Categoría: permite seleccionar la categoría adecuada para la aplicación.
-
Visibilidad del equipo: permite hacer que la entrada privada de la App Store no sea visible para ningún usuario interno (predeterminado), para todos los usuarios internos o para equipos específicos.
-
Descripción: descripción de la aplicación orientada al usuario. Se permite un formato limitado.
-
URL de soporte: la URL o el correo electrónico al que se deben dirigir los usuarios para obtener ayuda. Estas ubicaciones se deben supervisar de manera activa.
-
Correo electrónico de soporte: correo electrónico que debe recibir notificaciones de suscripción a la aplicación. Esta dirección se debe supervisar de manera activa.
-
Proveedor: nombre de la compañía.
-
Versión: versión actual de esta aplicación.
-
Imágenes: opcionalmente, se pueden cargar imágenes de resumen, principales y otras.
-
Haga clic en Crear.
La aplicación aparece en la Onshape App Store como privada. Solo el usuario y los equipos internos especificados en la configuración de visibilidad del equipo la pueden ver. Para hacer pública la aplicación, consulte la lista de verificación de lanzamiento a continuación.
- Click Developer in the left pane of your company settings.
- If your app has an Onshape App Store entry, delete that first:
- Click Store entries on the Developer page.
- Click the store entry to delete.
- Click Delete store entry on the Details tab.
- Click Delete again to confirm.
- Click Developer in the left pane or breadcrumbs to return the Developer landing page.
- Click OAuth applications in the Developer settings.
- Click the application to delete.
- Click Delete application on the Details tab.
- Haga clic en Eliminar de nuevo para confirmar.
Todas las solicitudes enviadas a Onshape App Store (Onshape Apps) deben seguir las instrucciones de la página Guía de API: OAuth2 y utilizar OAuth2 para la autorización. Los scripts de automatización (o las aplicaciones no destinadas a Onshape App Store) pueden usar OAuth2 o claves de API para la autenticación. OAuth2 permite a las aplicaciones llamar a las API de Onshape en nombre de los usuarios de la aplicación; las claves de API solo realizarán operaciones en nombre del usuario de Onshape que las generó.
Las claves de API son una forma útil de crear pequeñas aplicaciones para uso personal, lo que permite a los desarrolladores evitar la sobrecarga del flujo de trabajo de OAuth.
Las claves de API se utilizan para autenticar una aplicación, no a sus usuarios. (OAuth2 autentica una aplicación y a los usuarios de la aplicación al garantizar que los usuarios estén autorizados a acceder a Onshape). Una vez creada una clave de API, solo es válida en la pila en la que se creó. Una clave de API creada en nombredelaCompañía.onshape.com no funcionará en cad.onshape.com.
Las claves de API que no están asociadas a una compañía o empresa se pueden administrar a través de la página Mi cuenta: Desarrollador.
Individual accounts are capped at two (2) API keys. Delete API keys as needed. Company, classroom, and enterprise accounts are not capped.
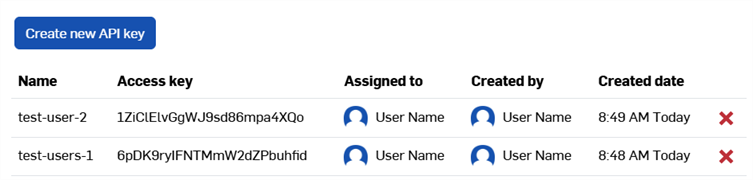
Visualización de claves de API
- En la configuración de compañía, aula o empresa para desarrolladores, haga clic en Claves de API
- Revise las claves de API disponibles para la compañía.
Creación de claves de API
- En la configuración de compañía, aula o empresa para desarrolladores, haga clic en Claves de API
- Haga clic en Crear nueva clave de API.
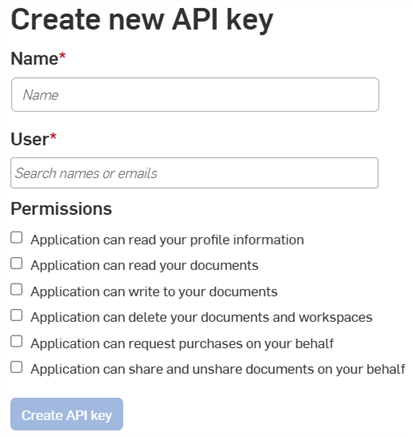
- Proporcione un nombre para la clave de API en el campo Nombre.
-
Asigne la clave de API a alguien de la empresa. Puede buscar por nombre o correo electrónico en el campo Usuario.
- Elija los permisos para las claves. Consulte los Alcances de los permisos a continuación.
- Haga clic en el botón Crear clave de API.
-
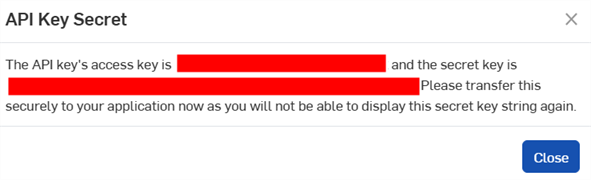
En la ventana emergente, copie la clave de API y la clave secreta que se muestran, guárdelas en algún lugar y, luego, haga clic en el botón Cerrar.
No podrá volver a acceder a esta clave secreta. Este secreto es exclusivo para usted y su aplicación. Debe protegerse como cualquier contraseña confidencial y nunca debe registrarse en el código de origen.
- Para obtener información sobre cómo autenticar sus aplicaciones con claves de API, consulte la Guía de API: Autenticación.
Eliminación de claves de API
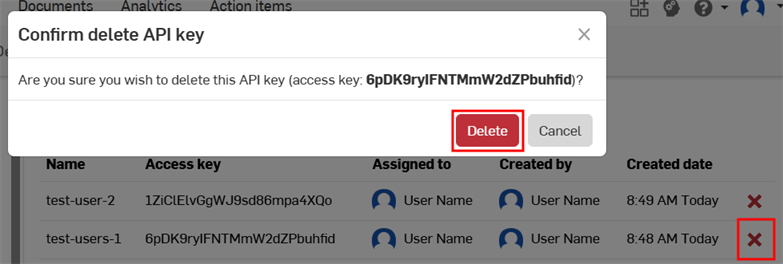
- Haga clic en el ícono de la «X» situado a la derecha de la clave de API que quiere eliminar.
- Confirme que quiere eliminar esta clave de API para todos los usuarios. Esta acción no se puede deshacer. Haga clic en Eliminar para confirmar.
Los siguientes alcances de permisos están disponibles al crear aplicaciones de OAuth:
-
La aplicación puede leer la información de su perfil (OAuth2ReadPII): active esta opción para permitir a la aplicación acceder a la información de su perfil.
-
La aplicación puede leer sus documentos (OAuth2Read): active este opción para otorgar a la aplicación acceso de lectura a sus documentos.
-
La aplicación puede escribir en sus documentos (OAuth2Write): active esta opción para otorgar a la aplicación acceso de escritura a sus documentos.
-
La aplicación puede eliminar sus documentos y áreas de trabajo (OAuth2Delete): active esta opción a para permitir a la aplicación acceder a sus documentos y áreas de trabajo y eliminarlos.
-
La aplicación puede solicitar compras en su nombre (OAuth2Purchase): active esta opción para que la aplicación pueda realizar compras por usted.
-
La aplicación puede compartir y dejar de compartir documentos en su nombre (OAuth2Share): active esta opción para permitir que la aplicación pueda compartir y dejar de compartir sus documentos.