 Bild einfügen


Verfügbar in: Skizzen
Verwenden Sie ein importiertes Bild als Basis für eine Skizze. Fügen Sie ein Bild aus dem derzeit aktiven Dokument, anderen Dokumenten oder einer Bildbibliothek in Ihr Dokument ein. Öffnen Sie dieses Bild anschließend in einer Skizze. Erstellen Sie eine Skizzengeometrie unter Verwendung des Bildes als Hilfsvorlage. Unterstützte Bildtypen sind: PNG, JPEG und BMP.
 Schritte
- Klicken Sie hier
 , um das Dialogfenster „Bild einfügen“ zu öffnen:
- Wählen Sie aus, ob Sie ein Bild aus dem aktuellen Dokument, anderen Dokumenten oder aus einer Bildbibliothek einfügen möchten. Wenn keine Bilddateien aufgeführt sind, verwenden Sie den Link zum Importieren unten im Dialogfenster.
Aktuelles Dokument: Wählen Sie ein Bild aus dem aktiven Dokument aus (oder verwenden Sie die Suchleiste, um eines zu finden). Sie können auch eine Version erstellen oder das Versionsdiagramm des Dokuments anzeigen.
Andere Dokumente: Wählen Sie ein Bild aus anderen Company-Dokumenten aus (oder finden Sie eines mit der Suchleiste.
Bibliotheken: Wählen Sie ein Bild aus einer Bildbibliothek aus (oder finden Sie eines mit der Suchleiste). Wählen Sie eine Bibliothek aus dem Dropdown-Menü und dann ein Bild aus.
- Klicken Sie unten im Dialogfenster auf „Fertig“. Klicken Sie dann auf das Bild im Grafikbereich und ziehen Sie es in die gewünschte Position. Das Seitenverhältnis des Bildes wird beibehalten und während des Ziehens mit einer gestrichelten Linie dargestellt.
Standardmäßig wird eine horizontale Zwangsbedingung auf die untere Kante des Felds angewendet.
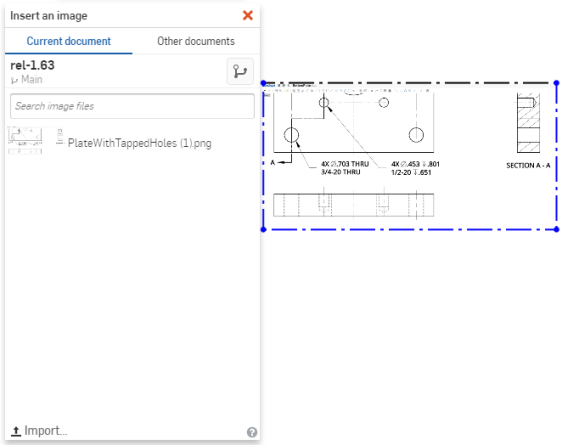
Das Bild wird halbtransparent, wenn Sie es bewegen, damit Sie es leichter platzieren können.
Um das Bild zu drehen, löschen Sie zuerst die standardmäßig angewendete horizontale Zwangsbedingung. Dann verankern Sie eine Ecke und ziehen an einer andere Ecke des Bildes.
Sie können das Bild als Grundlage für eine Skizze verwenden und „durchpausen“. Bei der ersten Bemaßung der Skizzengeometrie wird das Bild ebenfalls skaliert.
Bildbibliotheken
Bildbibliotheken sind spezielle Ordner, die Bilder enthalten. Jede Company kann eine Bildbibliothek mit einem Administrator als Eigentümer haben (mit erteilten Freigabeberechtigungen für die Company). Darüber hinaus können Einzelpersonen jeweils eine Bildbibliothek für den persönlichen Gebrauch einrichten, ohne dass besondere Berechtigungen erforderlich sind.
Bildbibliothek erstellen
Bildbibliotheken werden in Onshape-Ordnern erstellt und gespeichert. Von der Dokumentenseite:
-
Erstellen Sie einen Ordner. (Company-Bibliotheken müssen im Stammordner erstellt werden).
-
Rechtsklicken Sie auf den Ordner in der Liste Projekte und Ordner und gehen Sie mit der Maus im Kontextmenü über die Option Bibliothek festlegen, um die erweiterten Menüoptionen aufzurufen.
-
Klicken Sie in den erweiterten Menüoptionen auf Meine Bilder. Dadurch wird der Ordner als Ihre Bildbibliothek festgelegt.
Sobald der Ordner als Ihre Bildbibliothek festgelegt ist, rechtsklicken Sie auf den Ordner und bewegen den Mauszeiger über die Option Bildbibliothek, um die folgenden zusätzlichen Kontextmenü-Optionen aufzurufen:
-
Meine Bibliothek aktualisieren: aktualisiert Ihre Bibliothek (nützlich, wenn Änderungen an einem Dokument in der Bildbibliothek vorgenommen werden).
-
Einrichtung meiner Bibliothek rückgängig machen: setzt die Ordnerauswahl für Ihre Bildbibliothek zurück. (Dadurch wird die Bezeichnung des Ordners als Benutzer-/Company-Bibliothek entfernt, ohne den Ordner oder seinen Inhalt zu löschen.)
-
Als <Company>-Bibliothek festlegen: richtet den ausgewählten Ordner als Company-weite Bildbibliothek ein.
Unterstützte Dateiformate
-
JPEG
-
PNG
-
GIF
-
BMP
Bezugstexte
- Die maximale Bildgröße hängt vom Grafikprozessor Ihres Geräts ab (siehe https://webglreport.com). Stellen Sie sicher, dass die Breite und Höhe des Bilds der Pixelgrenze nicht die maximale Texturgröße überschreiten.
- Zum Drehen eines Bildes entfernen Sie die horizontale Zwangsbedingung, verankern eine Ecke und ziehen eine andere Ecke.
- Entfernen Sie zum Verschieben eines Bildes alle Zwangsbedingungen. Klicken Sie auf das Bild und ziehen Sie es an die gewünschte Position.
- Sie können das Bild als Grundlage für eine Skizze verwenden und „durchpausen“.
- Durch die Bemaßung der Skizzengeometrie wird das Bild ebenfalls skaliert. Allerdings skaliert nur die erste angewendete Bemaßung das Bild. Entfernen Sie die zusätzlichen Bemaßungen und passen Sie die verbleibende an, um das Bild neu zu skalieren.
- Wenn Sie die Skizze ausblenden oder anzeigen, wird das Bild ebenfalls angezeigt bzw. verborgen.
- Bei diesem Feature wird der Alphakanal unverändert beibehalten. Ist er transparent, bleibt er auch so in Onshape.
- Sie können ein Bild (als Skizzenelement) innerhalb eines Part Studios und zwischen Part Studios kopieren und einfügen.
- Sie können zum Auswählen einer anderen Bilddatei oder zum Hochladen einer neuen Bilddatei das Kontextmenü und den Befehl „Bild bearbeiten“ verwenden.
- Wenn sich die Quelle des Bildes ändert, kann es in seiner Registerkarte mit der Option „Update“ auf dem Registerkarten-Kontextmenü aktualisiert werden. Auf diese Weise wird das Bild überall dort, wo es im Dokument verwendet wird, aktualisiert.
Weitere Informationen finden Sie im Learning-Center-Kurs Einführung zur Skizzenerstellung (Onshape-Konto erforderlich).