Mein Konto – Entwickler

Benutzer können Anwendungen, App-Store-Einträge und API-Schlüssel in ihren Entwicklereinstellungen registrieren und verwalten.
Die Schritte auf dieser Seite gelten nur für einzelne Benutzer. Company-, Classroom- und Enterprise-Administratoren müssen diese Schritte befolgen: Company/Classroom/Enterprise-Einstellungen: Developer.
Alle Anwendungen, die in den Company-/Classroom-/Enterprise-Einstellungen erstellt wurden, werden auf die API-Limits der Company angerechnet. Alle im Entwicklerportal erstellten Anwendungen werden auf die API-Limits des einzelnen Benutzers angerechnet.
Für alle im Onshape App Store (Onshape Apps) eingereichten Anwendungen müssen den Anleitungen auf der Seite API Guide: OAuth2 befolgt und OAuth2 zur Autorisierung verwendt werden. Automatisierungsskripte (oder Anwendungen, die nicht für den Onshape App Store gedacht sind), können entweder OAuth2- oder API-Schlüssel für die Authentifizierung verwenden. Bei OAuth2 können Anwendungen Onshape-APIs für die Benutzer aufrufen. API-Schlüssel führen hingegen nur Operationen für den Onshape-Benutzer aus, der die API-Schlüssel generiert hat.
Weitere Informationen zur Entwicklung von Anwendungen mit Onshape finden Sie in den folgenden Ressourcen:
* Onshape-Dokumentation für Entwickler
* Glassworks API-Explorer
* Beispielcode
Um zu Ihren Entwickler-Einstellungen in Onshape zu navigieren, klicken Sie auf Ihr Kontobenutzer-Symbol ( ) rechts oben im Onshape-Fenster. Dies öffnet ein Dropdown-Menü. Klicken Sie auf „Mein Konto“.
Klicken Sie in der Liste links auf der Seite auf Entwickler:
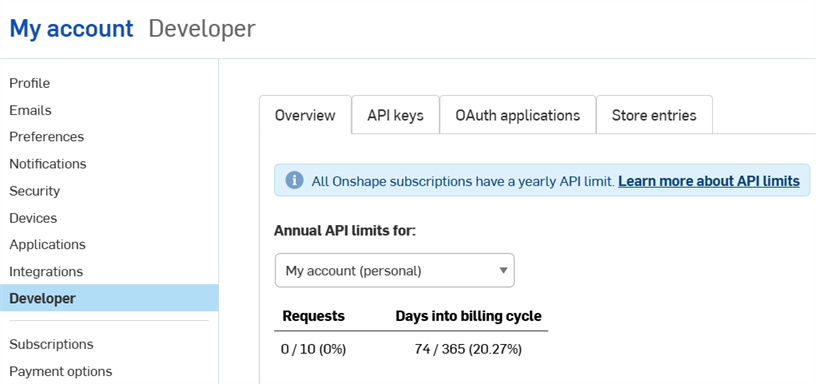
Auf dieser Seite haben Sie folgende Möglichkeiten:
-
eine neue OAuth-Anwendung bei Onshape registrieren
-
korrekt authentifizierte Apps beim Onshape App Store einreichen
-
API-Schlüssel für den individuellen Gebrauch anzeigen, erstellen und löschen
-
Eigene API-Nutzung anzeigen
- Weitere Informationen zur API-Nutzung finden Sie unter API-Limits.
- Klicken Sie auf das Dropdown-Menü Jährliche API-Limits, um ein anderes Konto auszuwählen.
-
Benachrichtigungs-E-Mails werden bei 25 %, 50 %, 75 % und 100 % der Nutzung an alle Administratoren gesendet.
 Workflow bei der App-Entwicklung
Folgende Schritte sind notwendig, wenn Sie eine App erstellen möchten, die in der Onshape-Benutzeroberfläche für interne Zwecke oder zum Testen geöffnet wird:
- Registrieren Sie die App bei Onshape.
- Erstellen Sie eine Erweiterung für die App in der Onshape-Benutzeroberfläche.
- Erstellen Sie einen App-Store-Eintrag und abonnieren Sie ihn.
Wenn Sie die App im Onshape App Store für Endbenutzer veröffentlichen möchten, sind dagegen diese Schritte erforderlich:
- Authentifizieren Sie sich mit OAuth2.
- Füllen Sie die Launch-Checkliste aus.
API-Schlüssel verwalten
API-Schlüssel sind eine nützliche Methode, um kleine Anwendungen für den persönlichen Gebrauch zu erstellen, sodass Entwickler den Aufwand des OAuth-Workflows vermeiden können.
API-Schlüssel werden verwendet, um eine Anwendung zu authentifizieren, nicht ihre Benutzer. (OAuth2 authentifiziert eine Anwendung und Benutzer der Anwendung, indem sichergestellt wird, dass die Benutzer für den Zugriff auf Onshape autorisiert sind.)
Wenn Sie einen API-Schlüssel erstellt haben, ist er nur in dem Stack gültig, auf dem er erstellt wurde. Ein API-Schlüssel, der auf Ihrem Unternehmens-Stack (d. h. companyName.onshape.com) erstellt wurde, funktioniert nicht auf dem Production-Stack (cad.onshape.com). Administratoren können auch API-Schlüssel für Benutzer in ihrer Company verwalten: siehe Company-/Kurs-/Enterprise-Einstellungen — Entwickler.
Für individuelle Konten gilt eine Obergrenze von zwei (2) API-Schlüsseln. Löschen Sie API-Schlüssel nach Bedarf. Für Company-, Classroom- und Enterprise-Konten gibt es keine Obergrenze.
API-Schlüssel anzeigen
- Klicken Sie auf der Entwicklerseite auf API-Schlüssel.
- Zeigen Sie alle Ihre zuvor erstellten API-Schlüssel an.

API-Schlüssel erstellen
- Klicken Sie auf Neuen API-Schlüssel erstellen.
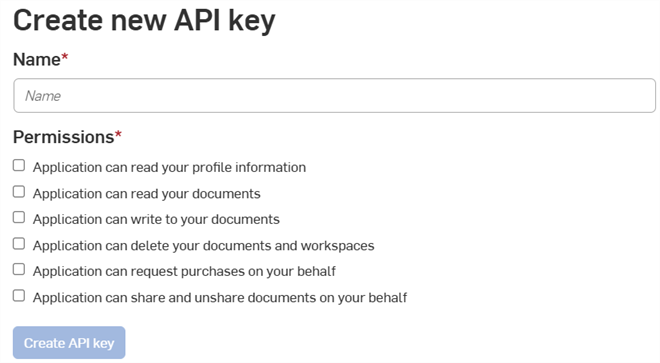
- Benennen Sie den API-Schlüssel im Feld Name.
- Legen Sie die Berechtigungen für die Schlüssel fest. Siehe Berechtigungsbereiche unten.
- (Optional) To choose an expiration date for the API key:
- Toggle on the Enable TTL (Time to live) button.
- Enter or select a date in the date field. You will receive an email notification when the key is about to expire.
- Klicken Sie auf die Schaltfläche API-Schlüssel erstellen.
-
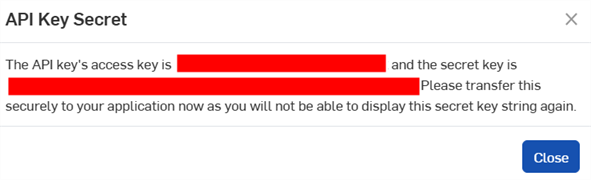
Kopieren Sie im Popup-Fenster den angezeigten API-Schlüssel und den geheimen Schlüssel, speichern Sie sie und klicken Sie dann auf die Schaltfläche Schließen.
Sie können den geheimen Schlüssel nicht mehr erneut anzeigen. Bewahren Sie ihn deshalb an einem sicheren Ort auf!
API-Schlüssel löschen
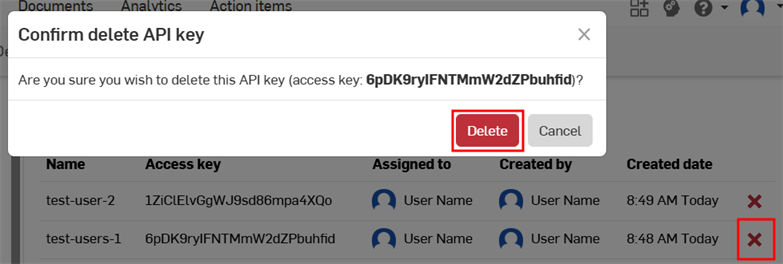
- Klicken Sie auf das „X“-Symbol rechts neben dem API-Schlüssel, den Sie löschen möchten.
- Bestätigen Sie, dass Sie diesen API-Schlüssel löschen möchten. Diese Aktion kann nicht rückgängig gemacht werden. Klicken Sie zur Bestätigung auf Löschen.
Moving API keys
API keys cannot be moved between accounts, nor can they be moved from the user level to the company level or vice versa.
If you created an API key on the wrong account:
-
Create a new API key for the correct account:
-
To create an API key at the user level, see Creating API Keys on this page..
-
To create an API key at the company, classroom, or enterprise level, see the Company Settings - Developer docs..
-
-
Replace all references to the original API key throughout your code, and verify the code works as expected.
-
Delete the original API key.
OAuth-Anwendungen verwalten
OAuth-Anwendung erstellen und registrieren
-
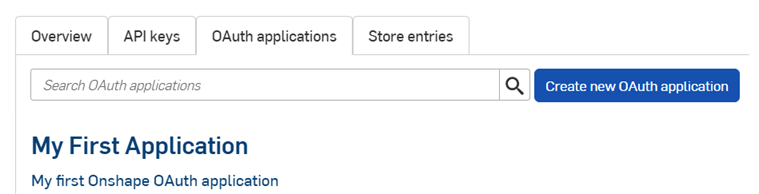
Klicken Sie auf der Entwicklerseite auf den Link OAuth-Anwendungen, um eine Liste all Ihrer Apps zu sehen:
-
Klicken Sie auf die Schaltfläche Neue OAuth-Anwendung erstellen.
-
Füllen Sie das Formular aus:
-
Name: Name der Anwendung, die Benutzern angezeigt wird
-
Primäres Format: Zeichenfolge, die Ihre Anwendung eindeutig identifiziert und an der sich die Daten erkennen lassen, die die App möglicherweise auf Onshape-Servern speichert (z. B. com.beispiel.beispiel). Wurde die App registriert, kann dies nicht mehr geändert werden. Wird Benutzern nicht angezeigt.
-
Zusammenfassung: Beschreibung der angezeigten Anwendung für Benutzer, wenn sie gebeten werden, der Anwendung den Zugriff auf die eigenen Daten zu erlauben.
-
Weiterleitungs-URLs: URL, zu der Sie nach der Authentifizierung weitergeleitet werden (die Landing-Page Ihrer Anwendung).
- Ihre Anwendung muss mindestens eine URL angeben, die beim OAuth-Protokollaustausch verwendet wird.
-
Diese URL muss auch SSL verwenden (eine URL, die mit https beginnt). Es gibt allerdings zwei Ausnahmen für installierte Desktop-Anwendungen: http://localhost: <port>und urn:ietf:wg:oauth:2.0:oob.
-
Typ: Anwendungstyp, Optionen: Integrierte Cloud-App, Verbundene Cloud-App oder Verbundene Desktop-App.
-
OAuth-URL: die URL, die verwendet wird, um den OAuth2-Prozess zur Benutzerauthentifizierung zu starten. Weitere Informationen finden Sie in der Entwicklerdokumentation unter „OAuth2“.
-
Sollte die URL Ihrer bereitgestellten Anwendung enthalten.
-
Dies ist die erste URL, die von der Onshape-Anwendungsseite aufgerufen wird.
-
Die Seite, die unter dieser URL gehostet wird, sollte die OAuth-Authentifizierung verarbeiten. Sobald der Server Ihrer Anwendung im Auftrag des Benutzers authentifiziert wurde, sollte dieser Benutzer zu Ihrer Anwendung umgeleitet werden.
-
Wenn Sie Ihre App noch nicht bereitgestellt haben, können Sie dieses Feld für die Arbeit an einem lokalen Rechner leer lassen und es später aktualisieren.
Alle Anwendungen, die im Onshape App Store zur öffentlichen Verwendung eingereicht werden, müssen korrekt mit OAuth2 authentifiziert werden. Weitere Informationen finden Sie in der Entwicklerdokumentation unter „OAuth2“.
-
-
Einstellungen
-
Unterstützt Zusammenarbeit: aktivieren, wenn Sie bei der Entwicklung der Anwendung mit anderen Benutzern zusammenarbeiten möchten
-
- Berechtigungen: siehe Berechtigungsbereiche unten
-
-
Klicken Sie auf Anwendung erstellen.
-
Kopieren Sie den geheimen OAuth-Schlüssel aus dem Fenster.
Sie werden nicht wieder auf diesen geheimen Schlüssel zugreifen können. Dieses Geheimnis gilt nur für Sie und Ihre App. Es sollte wie jedes vertrauliche Passwort geschützt und niemals in den Quellcode integriert werden.
-
Der OAuth-Anwendungseintrag der App wird angezeigt, während die Registerkarte Details aktiv ist. Wenn Sie den Namen der App auf der Registerkarte OAuth-Anwendung auswählen, gelangen Sie jetzt zu diesem Bildschirm.
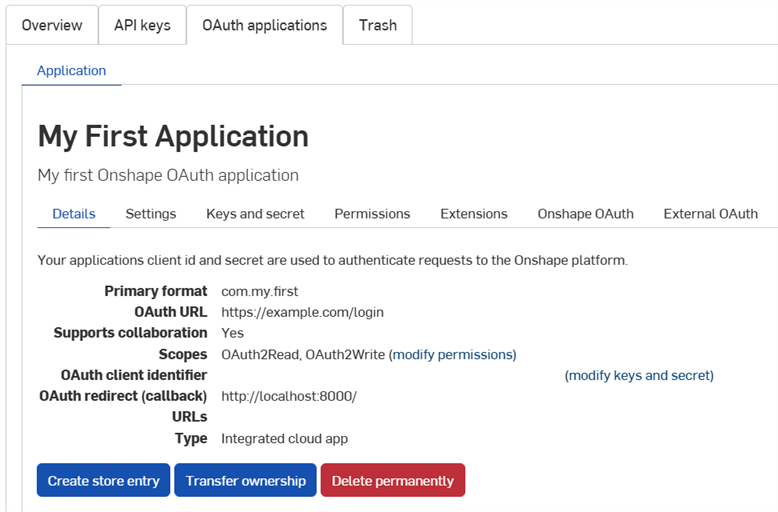
Mit den Registerkarten auf diesem Bildschirm haben Sie folgende Möglichkeiten:
-
Details:
-
Einstellungen: App-Einstellungen verwalten
- Schlüssel und Geheimnis:
- OAuth-Client-Identifikationsschlüssel kopieren
- Neuen geheimen OAuth-Client-Schlüssel erzeugen
-
Berechtigungen: Berechtigungsbereiche der App ändern
-
Erweiterungen: App-Erweiterungen verwalten
-
Onshape OAuth: Onshape-Authentifizierung verwalten
-
Externes OAuth: Drittanbieter-Authentifizierung verwalten
Weitere Informationen finden Sie in der Onshape-Dokumentation für Entwickler, einschließlich: korrekte Authentifizierung mit OAuth2 und Ausfüllen der Launch-Checkliste. Ein funktionierendes Beispiel finden Sie im Tutorial Hello World.
Eine Erweiterung erstellen
-
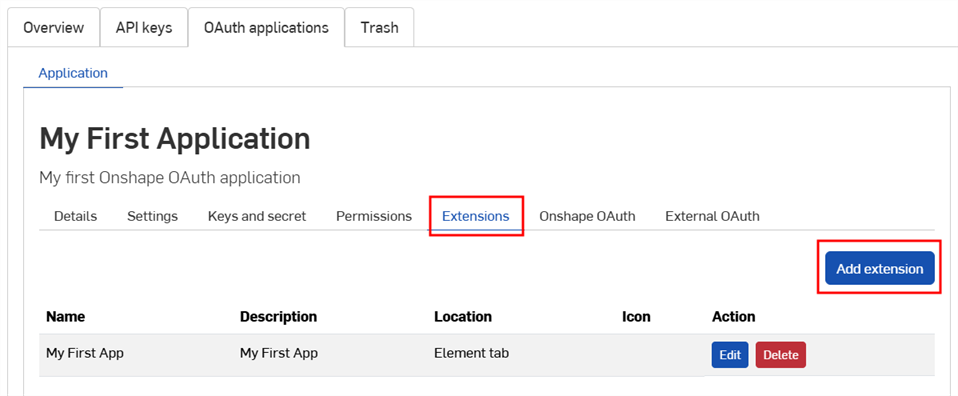
Klicken Sie auf der Entwickler-Seite in der Registerkarte auf OAuth-Anwendungen und wählen Sie dann Ihre Anwendung aus.
-
Klicken Sie auf die Registerkarte Erweiterungen.
-
Klicken Sie auf Erweiterung hinzufügen.
-
Füllen Sie das Formular aus:
-
Name: kann in der Benutzeroberfläche abgeschnitten werden, wenn er zu lang ist.
-
Beschreibung (optional): erscheint nicht in der Onshape-Benutzeroberfläche, könnte aber bei der Authentifizierung zu sehen sein.
-
Position: wo die Erweiterung in der Onshape-Benutzeroberfläche zu finden ist.
-
Weitere Informationen finden Sie in der Entwicklerdokumentation unter Unterstützte Positionen und Kontexte.
-
Sie können nur eine Element-Registerkartenerweiterung pro Anwendung erstellen.
-
-
Kontext: Manche Positionen funktionieren im Kontext einer Auswahl, zum Beispiel in einem Part Studio.
-
Weitere Informationen finden Sie in der Entwicklerdokumentation unter Unterstützte Positionen und Kontexte.
-
-
Aktions-URL: Bei Positionen, die eine Benutzeroberfläche einbetten, definiert die Aktions-URL die Adresse der anzuzeigenden Seite. Handelt es sich bei einer Position um eine Aktion (Kontextmenü, Symbolleistenelement, Aktion im Dialogfenster usw.) und der Aktionstyp ist GET oder POST, gibt die Aktions-URL den REST-Endpunkt an. Handelt es sich bei der Position um die Aktion „In neuem Fenster öffnen“, entspricht die Aktions-URL der URL, die in dem neuen Fenster geöffnet werden soll.
-
Eine Liste der Parameter, die in diesem Feld verwendet werden können, finden Sie in der Entwicklerdokumentation unter Aktions-URL-Parameter.
-
-
Aktionstyp: Gilt für Standorte, die keine Benutzeroberflächen einbetten. Unterstützte Aktionstypen sind:
-
GET: löst einen GET-API-Aufruf unter Verwendung der Aktions-URL aus. Die Parameterersetzung erfolgt bei der Aktions-URL.
-
POST: löst einen POST-API-Aufruf mit der Aktions-URL und dem Aktionstext als Beitragstext. Die Parameterersetzung erfolgt sowohl für bei der Aktions-URL als auch beim Aktionstext.
-
In neuem Fenster öffnen: öffnet die Aktions-URL in einem neuen Browserfenster. Die Parameterersetzung erfolgt bei der Aktions-URL.
-
-
Aktionstext: gilt nur für POST-Aktionstypen. Der Aktionstext wird in einem POST-API-Aufruf übergeben und muss ein gültiges JSON-Format haben.
-
Antwort anzeigen: gilt nur, wenn der Aktionstyp GET oder POST ist. Wenn ausgewählt, wartet die Benutzeroberfläche auf eine Antwort und zeigt diese dann in einem Dialogfenster in der Benutzeroberfläche an. Die Antwort muss ein gültiges JSON-Format haben.
-
Symbol: Das Symbol wird dort angezeigt, wo die Erweiterung vorhanden ist. Das umfasst auch Symbole, die zu einer Informationspalette, einer Kontextmenü-Aktion, einer Symbolleisten-Schaltfläche, einer Aktions-Schaltfläche in einem Dialogfenster oder zu anderen unterstützten Positionen gehören.
-
-
Klicken Sie auf OK.
Weitere Informationen zum Erstellen und Verwalten von Onshape-Anwendungen finden Sie in der Onshape-Dokumentation für Entwickler. Ein funktionierendes Beispiel finden Sie im Tutorial Hello World.
Eigentümerschaft an der OAuth-App übertragen
- Klicken Sie in Ihren Entwicklereinstellungen auf OAuth-Anwendungen.
- Klicken Sie auf den Namen der App, die übertragen werden soll.
- Klicken Sie auf der Registerkarte Details auf die Schaltfläche Eigentümerschaft übertragen. Das Dialogfenster Übertragen wird geöffnet.

- Wählen Sie eine Option aus, um die App an eine Einzelperson, eine Company oder ein Enterprise zu übertragen.
- Um an eine Einzelperson zu übertragen, geben Sie den Namen oder die E-Mail-Adresse des neuen Eigentümers in das Suchfeld ein. Um die Eigentümerschaft an eine Company oder ein Enterprise zu übertragen, wählen Sie eine Option aus dem Dropdown-Menü aus.
- Klicken Sie auf Eigentümerschaft übertragen. Die Anwendung wird darauf aus Ihrer OAuth-Apps-Liste entfernt.
- Wenn die App an das Konto einer Einzelperson übertragen wurde, erhält dieser Benutzer eine E-Mail-Benachrichtigung und die App wird in seinem Onshape-Entwicklerportal angezeigt.
- Wenn die App an ein Company-, Classroom- oder Enterprise-Mitglied übertragen wurde, erhalten alle Administratoren eine E-Mail-Benachrichtigung und die App wird in ihren Entwicklereinstellungen angezeigt.
Der zukünftige Verbrauch und die Abrechnung von API-Aufrufen werden dem neuen Eigentümer zugerechnet. Weitere Informationen finden Sie unter API-Grenzwerte.
App deaktivieren und löschen
- Klicken Sie im linken Bereich Ihrer Company-Einstellungen auf Entwickler, klicken Sie dann auf OAuth-Anwendungen und wählen Sie anschließend die App aus, die Sie deaktivieren möchten.
- Klicken Sie auf die Schaltfläche Status, um den aktuellen Status der Anwendung und alle unterstützten Statusänderungen anzuzeigen. Zu den unterstützten Status gehören:
- Aktiv: Die Anwendung ist im Onshape App Store verfügbar.
- Deaktiviert: Die App ist nicht mehr im App Store verfügbar, aber bestehende Benutzer können weiterhin darauf zugreifen.
- In den Papierkorb verschoben: Die App wird von der Registerkarte OAuth-Anwendung entfernt und in die Registerkarte Papierkorb verschoben.
Das Verschieben in den Papierkorb ist erst erlaubt, wenn alle bezahlten Abonnements abgelaufen sind.
Alle Käufe und Zuschüsse werden bereinigt.
- Gelöscht: Die Anwendung wird dauerhaft aus dem Papierkorb entfernt. Das kann nicht rückgängig gemacht werden.
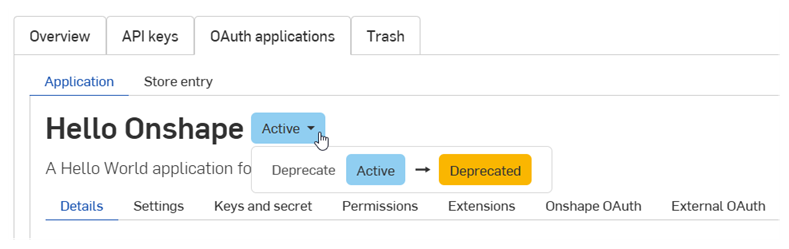
- Wählen Sie die gewünschte Statusänderung aus.
- Geben Sie den Namen der App ein und klicken Sie erneut zur Bestätigung im Dialogfenster.
Einreichungen beim Onshape App Store verwalten
Bevor Sie eine App an den Onshape App Store einreichen, sehen Sie sich unbedingt die Anforderungen in der Onshape-Dokumentation für Entwickler an, wie korrekte Authentifizierung mit OAuth2 und das Ausfüllen der Launch-Checkliste.
Eintrag im Onshape App Store erstellen
So erstellen Sie eine neue Store-Einreichung für eine OAuth-Anwendung:
-
Klicken Sie auf der Entwicklerseite auf OAuth-Anwendungen und wählen Sie dann Ihre Anwendung aus.
-
Klicken Sie in der Registerkarte Details der App auf Store-Eintrag erstellen.
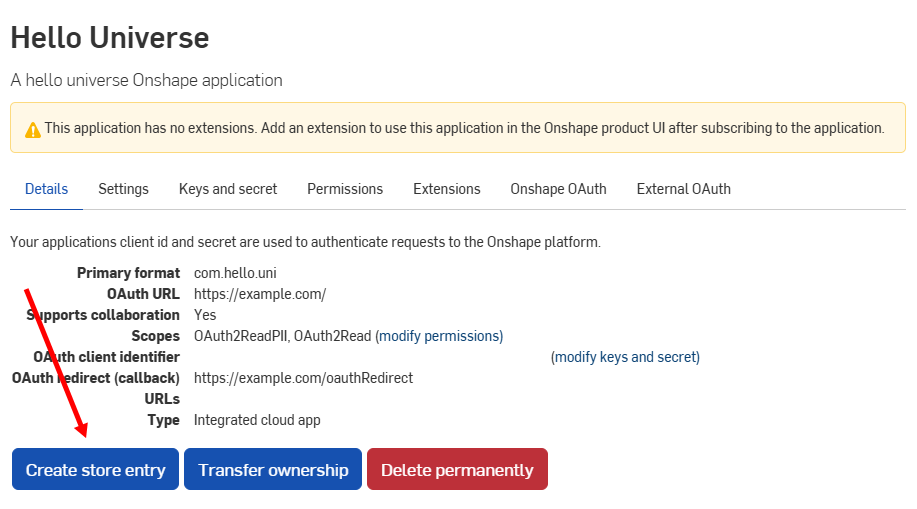
-
Füllen Sie das Formular aus:
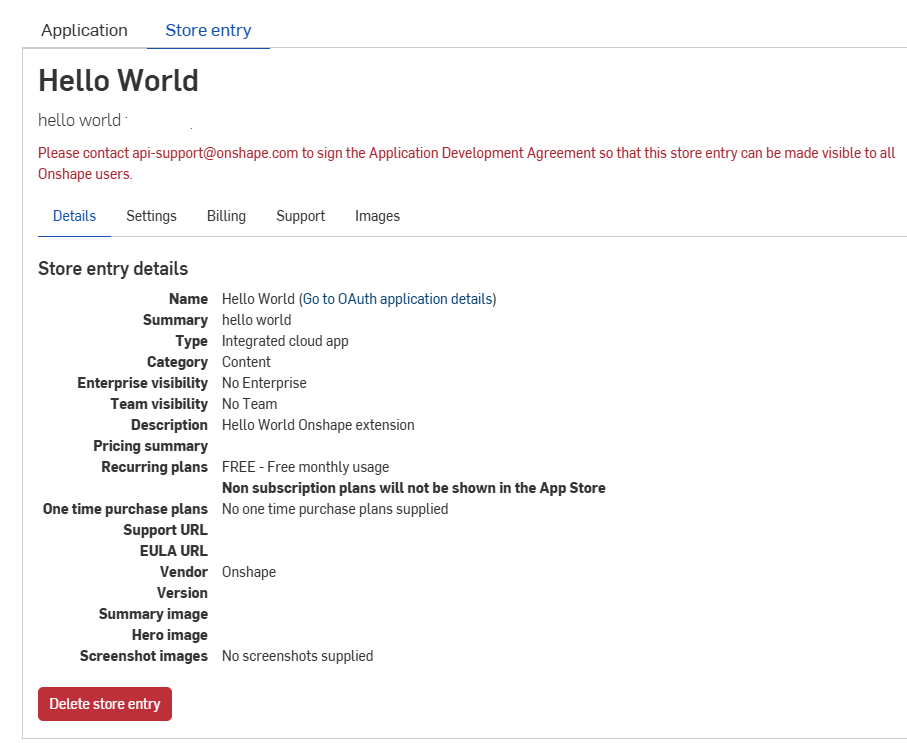
- Name: wird automatisch anhand des bei der Registrierung angegebenen App-Namens festgelegt.
-
Zusammenfassung: wird automatisch anhand der bei der Registrierung bereitgestellten Zusammenfassung festgelegt.
-
Typ – Anwendungstyp: Integrierte Cloud-App, Verbundene Cloud-App oder Verbundene Desktop-App. Dies sollte dem Typ entsprechen, der bei der Registrierung der OAuth-Anwendung ausgewählt wurde.
-
Kategorie: Wählen Sie die entsprechende Kategorie für Ihre App aus.
-
Team-Sichtbarkeit: Geben Sie an, ob die private Einreichung beim App Store für keine internen Benutzer (Standard), alle internen Benutzer oder bestimmte Teams zu sehen sein soll.
-
Beschreibung: Beschreibung der Anwendung, die dem Benutzer angezeigt wird. Eine gewisse Formatierung ist möglich.
-
Support-URL: URL oder E-Mail-Adresse, an die Benutzer Ihrer App weitergeleitet werden sollten, um Hilfe zu erhalten. Diese URL oder E-Mail-Adresse muss aktiv überwacht werden.
-
Support-E-Mail: E-Mail-Adresse, an die Benachrichtigungen zum App-Abonnement gehen sollen. Diese E-Mail-Adresse muss aktiv überwacht werden.
-
Anbieter: Ihr Company-Name.
-
Version: aktuelle Version dieser Anwendung.
-
Bilder: Laden Sie optional Übersichts-, Hero- und andere Bilder hoch.
-
Klicken Sie auf Erstellen.
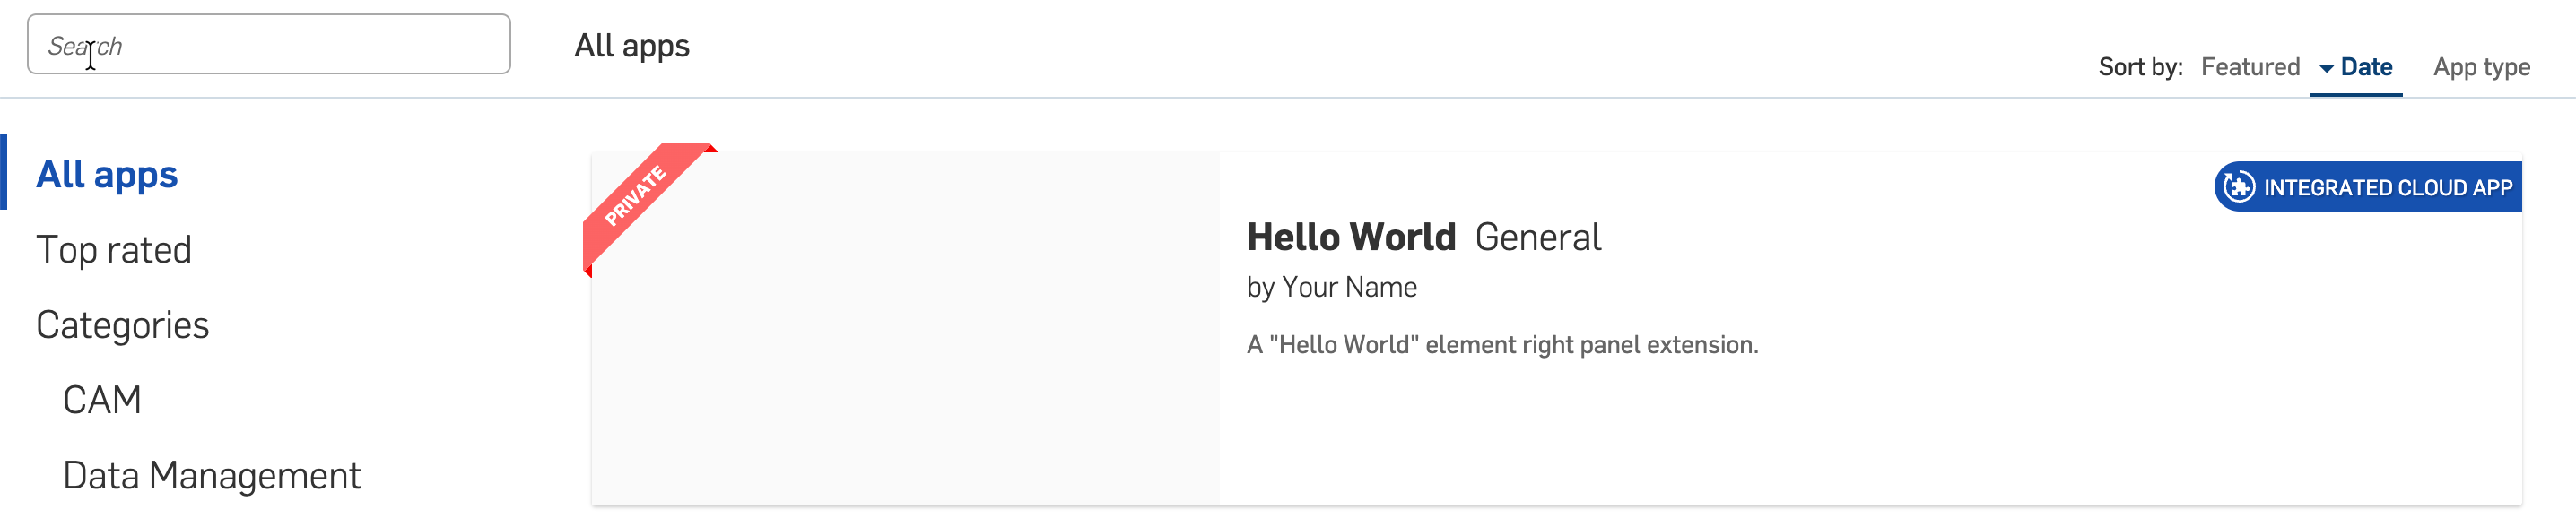
Die Anwendung wird im Onshape App Store als privat angezeigt. Sie ist nur für Sie und alle internen Teams sichtbar, die in den Team-Sichtbarkeitseinstellungen angegeben sind. Um die App öffentlich zu machen, sehen Sie sich als Nächstes die Launch-Checkliste an.
Um zu diesem Bildschirm zurückzukehren, klicken Sie auf die Registerkarte Store-Eintrag der Anwendung:
Ihre Onshape-App abonnieren
Einzelne Kontobenutzer können die App im Onshape App Store abonnieren:
- Gehen Sie zum Onshape App Store: https://cad.onshape.com/appstore
- Wählen Sie die App aus. Die App ist immer noch privat und kann nur von Ihnen als Ersteller gesehen werden:
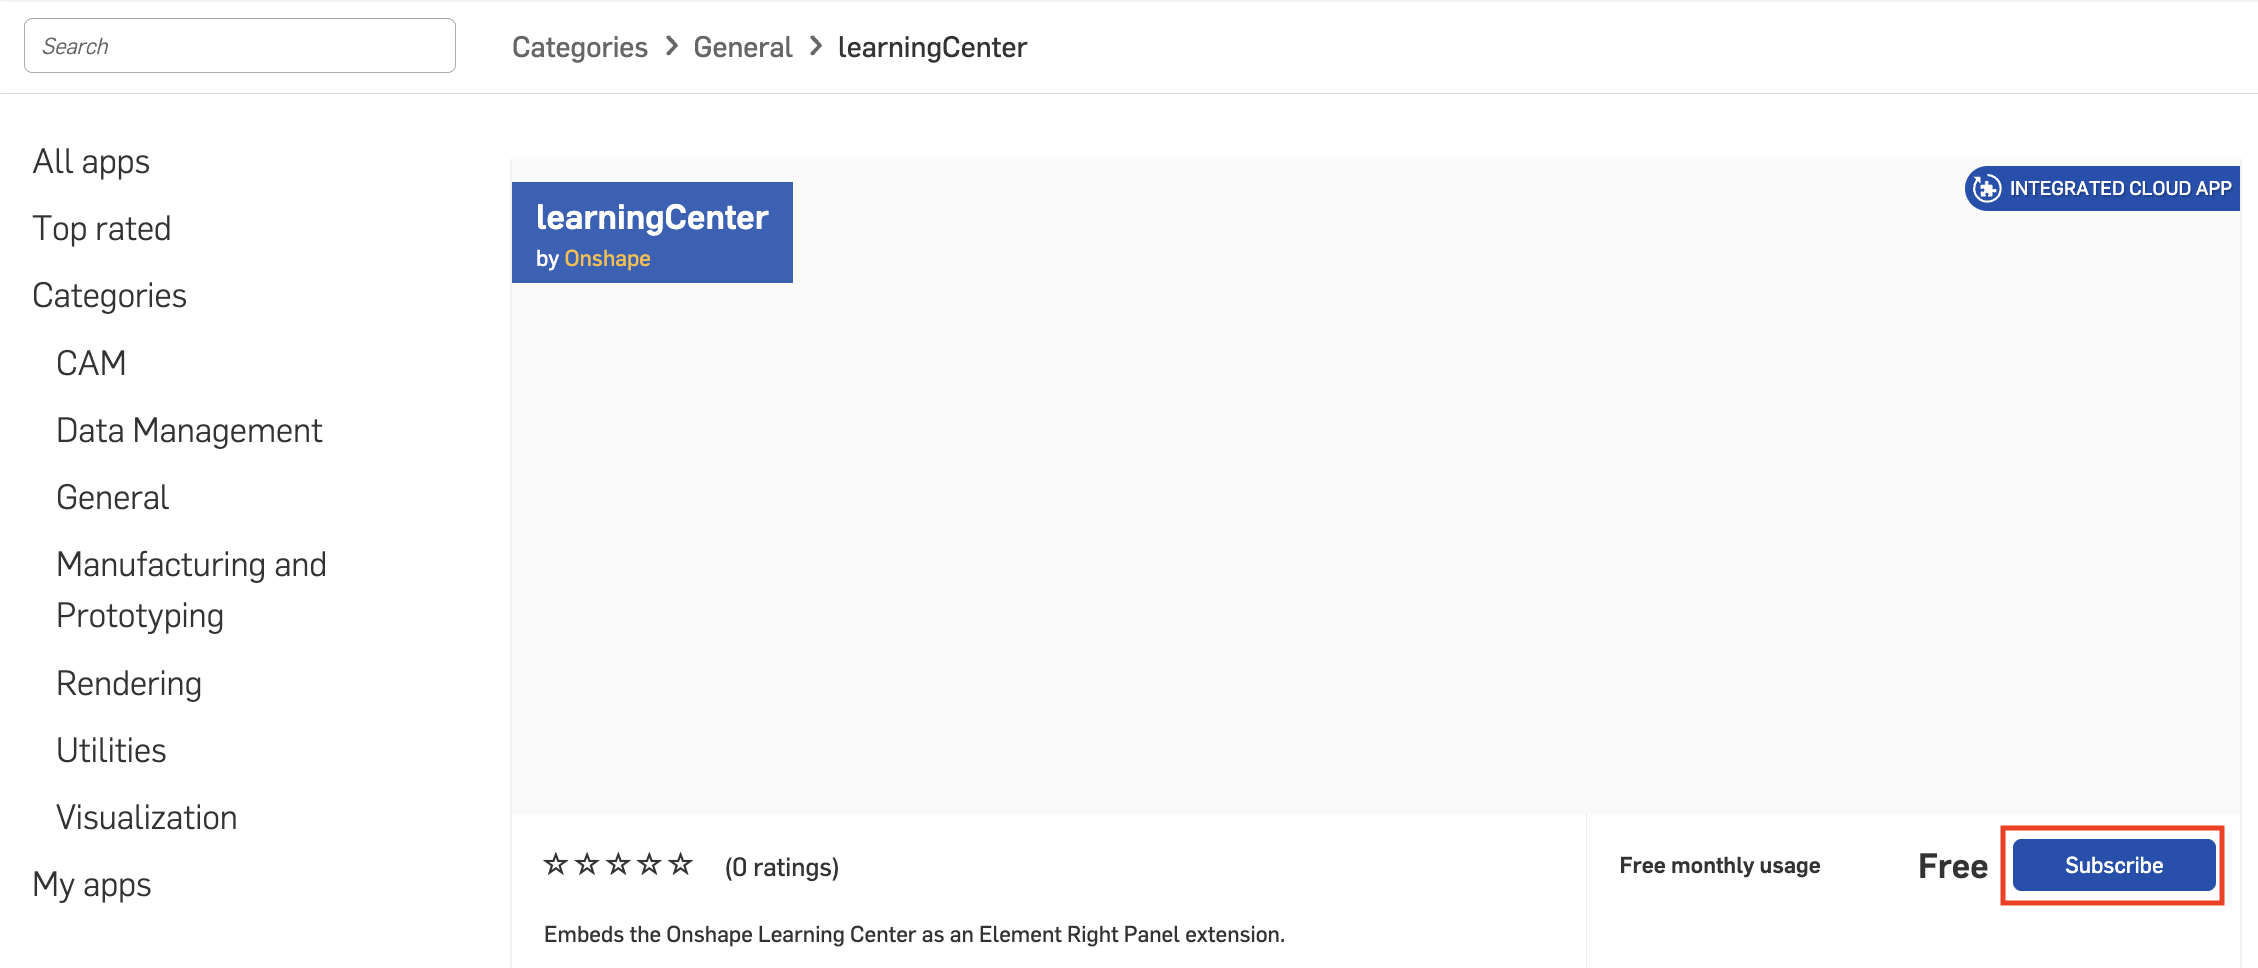
- Klicken Sie auf Abonnieren:
- Folgen Sie den Anweisungen auf dem Bildschirm, um die App zu abonnieren.
- Aktualisieren Sie Ihr Onshape-Browserfenster, um die App-Erweiterung zu testen.
Onshape App Store-Eintrag löschen
- Klicken Sie auf der Entwicklerseite auf OAuth-Anwendungen und wählen Sie dann Ihre Anwendung aus.
- Klicken Sie auf den Store-Eintrag, um ihn zu löschen.
- Klicken in der Registerkarte Details auf Store-Eintrag löschen
- Klicken Sie zur Bestätigung erneut auf Löschen.
Berechtigungsbereiche
Die folgenden Berechtigungsbereiche sind beim Erstellen von OAuth-Anwendungen verfügbar:
-
Anwendung darf Ihre Profilinformationen lesen (OAuth2ReadPII): Markieren Sie diese Option, um der Anwendung Zugriff auf Informationen in Ihrem Profil zu gewähren.
-
Anwendung darf Ihre Dokumente lesen (OAuth2Read): Markieren Sie diese Option, um der Anwendung Lesezugriff auf Ihre Dokumente zu gewähren.
-
Anwendung darf Ihre Dokumente ändern (OAuth2Write): Markieren Sie diese Option, um der Anwendung Schreibzugriff auf Ihre Dokumente zu gewähren.
-
Anwendung darf Ihre Dokumente und Arbeitsbereiche löschen (OAuth2Delete): Markieren Sie diese Option, wenn die Anwendung Zugriff zum Löschen Ihrer Dokumente und Arbeitsbereiche erhalten soll.
-
Anwendung darf in Ihrem Namen Käufe anfordern (OAuth2Purchase): Markieren Sie diese Option, wenn mit der Anwendung etwas gekauft werden darf.
-
Anwendung darf Dokumente in Ihrem Namen teilen/nicht mehr teilen (OAuth2Share): Markieren Sie diese Option, wenn mit der Anwendung Dokumente geteilt werden sollen und die Freigabe auch wieder aufgehoben werden kann.