 Composite Part
![]()
![]()
![]()
A part comprised of selected bodies (parts, surfaces, curves, and/or points) grouped together to act as one part. You can create a closed composite part (one which consumes the bodies involved) or an open composite part (one that does not consume the bodies involved).
A composite part can be used like any other part: you can apply features to it, insert it into an assembly, release it, create a drawing of it, include it as a single line item in a BOM, assign metadata, and even revision it as a single part.
In the Feature toolbar:
![]()
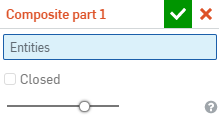
The Composite part feature tool allows you to create a part comprised of selected bodies (parts, surfaces, curves, and/or points) grouped together to act as one part. You can create a closed composite part (one which consumes the bodies involved) or an open composite part (one that does not consume the bodies involved). Click the Composite part feature tool on the toolbar. Select the entities used to make up the composite part. Check Closed to indicate that the bodies involved should no longer exist as separate entities. Click the green checkmark to accept the new composite part.
Steps
- Click
 .
.
- Select the parts, curves, surfaces, and/or points (also referred to as 'bodies') to be involved in the composite part:
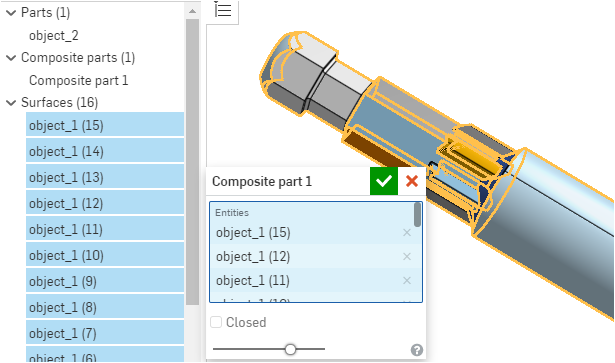
Notice that a Composite part is listed below the parts in the list; the selected bodies (entities) are listed in the Composite part 1 dialog box (you can rename this feature).
- Check the Closed checkbox to indicate that the bodies involved should no longer exist as separate entities.
Leave the box unchecked to indicate that the bodies should remain as separate entities in addition to being part of the composite part.
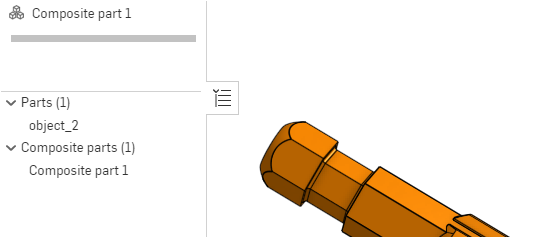
(Above) Image of closed composite body (Composite part 1, created by the feature Composite part 1): the selected surfaces are consumed and no longer listed separately
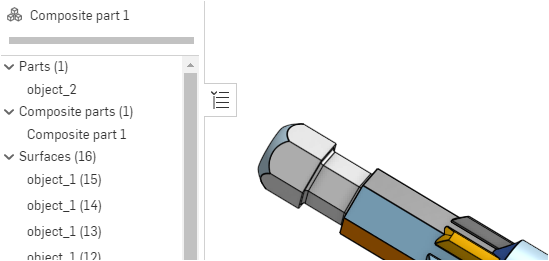
(Above) Image of open composite body (Composite part 1, created by the feature Composite part 1): the selected surfaces are not consumed and are still listed separately
-
When satisfied with your selections, click the checkmark
 to accept and close the dialog.
Converting closed composite parts to individual parts
When a closed composite part is created either through an import or manually in the Part Studio, you can change your mind and convert it to an open composite part or remove the composite part altogether and return to separate bodies. Use the Delete part tool, as shown below:
-
Select the Delete part
 in the Feature toolbar in the Part Studio.
- Select
Dissolve composite parts
in the drop down in the dialog:
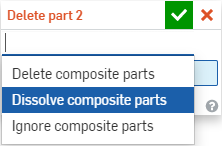
Dissolve composite parts reduces the composite part to its included bodies and removes the composite:
Before dissolving: one composite part and no surfaces in the list
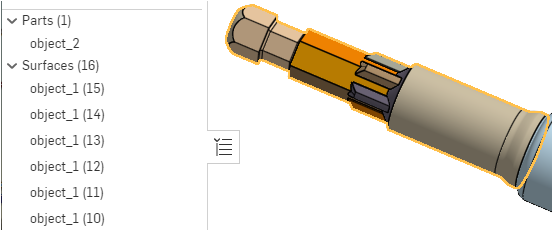
After dissolving: no composite parts but many surfaces in the list
- Click the checkmark to accept and close the dialog.
You can use Dissolve composite part on both a closed composite part and an open composite part.
You can select to delete the composite part or individual bodies, if the part is an open composite.
Ignore composite parts lets you select a specific body to remove; resulting in the ability to select a body and not the entire composite part:
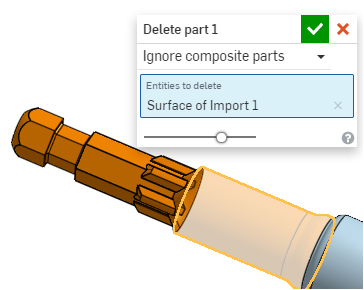
When Ignore composite part is selected, the individual bodies can be selected; here the body outlined in yellow was selected for removal
Tips
- Exporting a composite part results in the export of separate parts.
- Use the context menu (RMB) on the composite part in the Composite parts list or on the part itself in the graphics area to Hide other composite parts or Hide all composite parts:

- Composite parts are data-managed as a single part: you can release a composite part, assign metadata to it, revise a composite part, and each composite part is listed as a single line item in any bill of materials.
- A single body can be made a composite, if you wish.
- Creating a composite doesn't change the bodies selected in any way. If a body owns a mate connector, the mate connector stays with that body after it's made into a composite part as well.
- Reminder: A closed composite part consumes the bodies involved and they no longer appear in the Parts list as separate bodies. The Parts list in the Part Studio will list only the composite - graphically you still see and can act on the individual bodies. An open composite does not consume the bodies involved and they are still listed in the Parts list in the Part Studio along with the composite part. You can still act on the individual bodies if you wish.
- You can also create composite parts using FeatureScript. See the FeatureScript documentation for more information.
- You can use other feature tools on composite parts, for example Delete and Transform. Be aware that open and closed composites may work differently with the same feature.
- This is especially useful for restoring a body or a surface after an import process that fractures the body. Parts that are fractured during import will automatically be made composite as part of the same process. For more information on importing, see Importing Files.
- Composite parts never own Mate connectors; mate connectors are always owned by individual parts.
-
When creating a closed composite, and you select another composite (any type), the selected composite is consumed. When you use a composite in an open composite, the composite is not consumed.
-
Two open composites can overlap parts.
-
When creating a mate connector on a closed composite, you get the name of the Part+feature name -- in the dialog, not the part name (because the part no longer exists on its own).